Overview
I believe the memory palace technique is the most powerful weapon in the memory arsenal. This method is also known as the method of loci or the mind palace.
The techniques we have looked at are great, especially if you only need to memorize smaller lists of information. Furthermore, we can still use the other memory systems and combine them with the memory palace to create long-lasting memories that stick.
If you haven’t guessed already, the memory palace technique is my favorite.
History
The history of the memory palace technique goes back to hunter/gather societies, but it was made popular by a poet named Simonides of Ceos.
According to the legend, Simonides recited poetry at a nobleman’s place in Thessaly. After delivering the poem, two young men called for Simonides to join them outside.
Simonides didn’t see anyone outside and wandered around, looking for them. While he was out, the roof of the hall collapsed. Everyone inside was dead.
Friends and family members couldn’t identify the dead bodies because they were crushed so badly. Officials asked Simonides if he could remember who was in the building.
After some reflection, Simonides could recall the name of every person. He said he did it by creating a mental image of the room. As he scanned the picture, he could see where each person sat.
This event made Simonides think that orderly arrangement aided in memory. To train the memory, he believed, one must form mental images of new information and hang them in familiar locations.
How to Create a Memory Palace
Step One
When creating your first memory palace, you should choose a place you can easily imagine. For me, this was my childhood home. Choose any location that is familiar to you.
Step Two
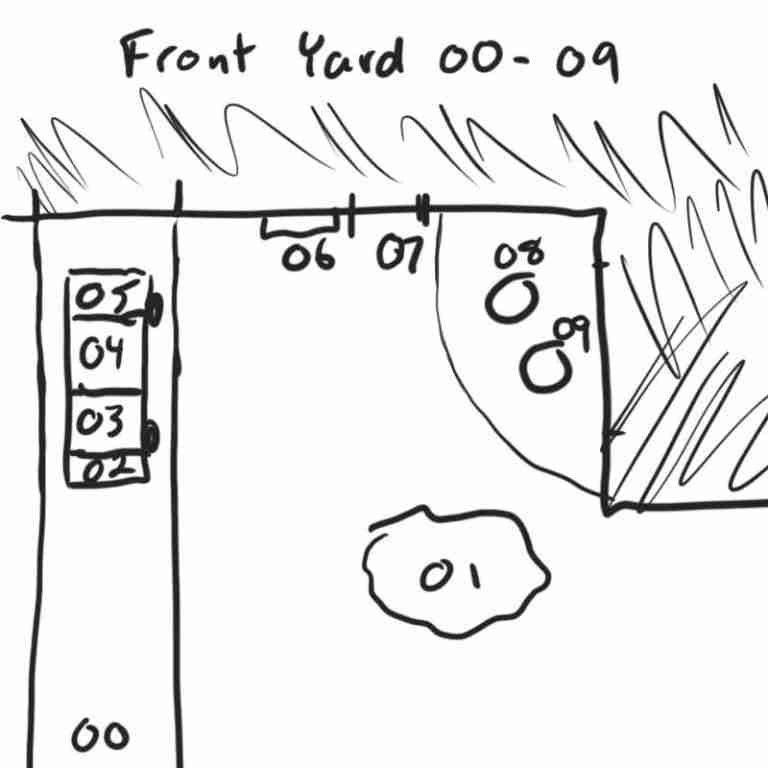
Plan through the route. You can do this on paper or in your head. Take note of each stop. As you can see in the image below, I start at the edge of the driveway, then move to a car parked in the driveway, which is divided into the trunk, back seat, front seat, and hood. Then I move to the mailbox, the front door, and two lawn chairs on a patio.
Don’t worry too much about making your route perfect the first time. Eventually, you can refine how you set up your memory palaces.
Step Three
Next, we practice by making a list to memorize. To demonstrate how to use some of the other concepts, like adding movement, exaggeration, substitution, etc., we will make a list of bones in a hand. I did not include the numbers of each bone in this exercise (for example, there are five metacarpals in each hand).
- Carpals
- Scaphoid
- Lunate
- Triquetrum
- Pisiform
- Trapezium
- Capitate
- Hamate
- Metacarpals
- Phalanges
Step Four
Take each item and place it in one slot of your memory palace. Because all these bones look the same and have unfamiliar, hard-to-imagine names, we need to use substitution, movement, exaggeration, etc., to remember the word.
Walk through Your Memory Palace
Spot One – Carpal
Stand in your first spot. Try to visualize it as clearly as possible. Imagine a giant blue carp standing around in your first spot. The blue carp jumps up and hugs you when you get close to it. It’s your carp-pal! Make the image as big, colorful, and crazy as you can.
Spot Two – Scaphoid
In your second spot, imagine a ska band. They’re dancing away in their weird checkered clothing until you get close to them. That’s when they all collapse with typhoid fever. They’re all lying on top of each other in a sweaty heap. They have “scaphoid.”
Spot Three – Lunate
In your third spot, imagine a lunar eclipse. Take the eclipse and eat it! Chop it hard! You ate the lunar eclipse: lunate. You could also use a loon if you know what it looks like.
Spot Four – Triquetrum
For triquetrum, I have chosen to think about three people heavily smoking. Billows of smoke pour through their mouths. One of them says, I quit. The others agree. They throw their cigarettes on the ground and stomp them out. A moment later, one says, “Not today.” The others agree and light up again. The three of them (tri) quit (quet) smoking. Tri-quet, and don’t forget to take a sip of rum.
If this image doesn’t work for you, think of your own to put in spot four.
Spot Five – Pisiform
The next one is a little strange. When you get to your fifth spot, two people are having a pissing contest! Even though they are perverts, they have incredible form! They are pisiform.
Spot Six – Trapezium
In spot six, you ask yourself, “Has the circus come to town?” A trapeze artist is doing somersaults in the air. That should be enough to trigger the word trapezium.
Spot Seven – Capitate
The next spot is a little sad. There is someone stuck in a guillotine. Depending on how gruesome you want to make the image, you can end there, knowing that they will be decapitated, or imagine the scene playing out until it’s bloody and gross. Just remember to remove the “de,” and you have the word you’re looking for: capitate.
Spot Eight – Hamate
In the eighth spot, imagine finding a big ol’ leg of ham. Grab it. Eat it up. That’s hamate.
Spot Nine – Metacarpal
In this spot, a giant orange carp rushes up to you. It shakes your hand and says, “Pleased to meet you!” You’ve just met-a-carp-pal!
Spot Ten – Phalanges
Fans of The Office will appreciate this one. Phyllis and Angela from The Office are hanging out in spot number ten. They’re playing patty cake and waiting for you to join them!
If you’re not sure who Phyllis and Angela are, you could try to imagine an ancient Greek army standing in a rectangle. This formation is called a phalanx. The word phalanx should trigger phalanges.
Join Conrad Andrews on Facebook to get updates on the latest techniques in learning.